Getting started with uCommerce
![ucommerce-logo-symbol[1] ucommerce-logo-symbol[1]](http://blogs.thesitedoctor.co.uk/tim/images/GettingstartedwithuCommerce_C43D/ucommercelogosymbol1.png) I thought seeing as uCommerce is now an actual product I would start to overview an install/configuration of uCommerce assuming no prior knowledge of uCommerce. Firstly, let me start of by saying that once you've got your head around uCommerce and some of it's complexities, you'll find it a fantastic product that makes creating a new ecommerce website as easy as setting up a standard Umbraco website. It is still missing a few features, but you can easily work around these with a bit of custom XSLT/C#.
I thought seeing as uCommerce is now an actual product I would start to overview an install/configuration of uCommerce assuming no prior knowledge of uCommerce. Firstly, let me start of by saying that once you've got your head around uCommerce and some of it's complexities, you'll find it a fantastic product that makes creating a new ecommerce website as easy as setting up a standard Umbraco website. It is still missing a few features, but you can easily work around these with a bit of custom XSLT/C#.
Ok, back to setting up your first uCommerce website. I've grouped these into what I feel are logical sections but if I've missed something, please let me know.
1. Install the uCommerce Package
If you've not already done so, go to the uCommerce Download page and download the uCommerce package (at time of writing, I'm using 1.0.4.2) and then download the uCommerce Store package (currently 1.0.1.2).
Install the uCommerce package as you do any other package in Umbraco. Once installed you'll be able to install the store package.
Assuming all your permissions on your Umbraco install are correct, refresh your browser and you should have a new section "Commerce". If they're not right, you'll be told to add a few web.config settings.
2. Wire up the catalog
This is the step that I didn’t “do” when we first got started and it turns out it’s one of the most important steps as it joins the uCommerce catalog to the front end.
- Go to your Umbraco "Content" section
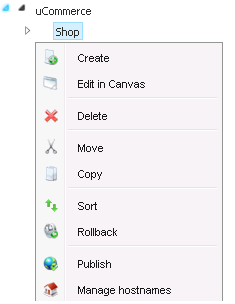
- Right click on the page you would like to be the store's "home" page (in the example store, this would be "Shop")
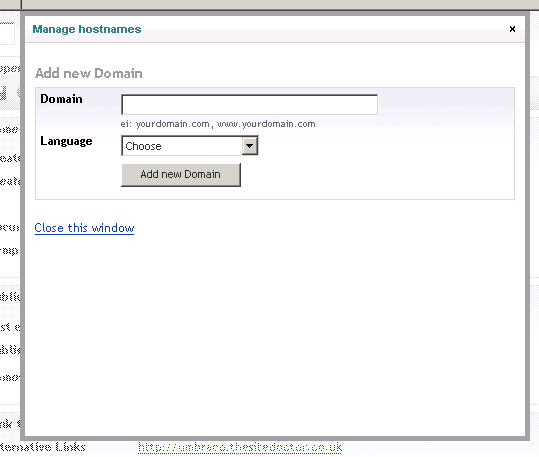
- Click "Manage hostnames" (see figure below)

- Enter your hostname (the domain name the site runs on) in the "Domain" box and then choose the default language for the website

- Click "Add new Domain" and then "Close this window"
- Click the "Commerce" section button (in the bottom left)
- Click the little arrow to the left of "Product Catalog"
- Left click the relevant catalog (if you've installed the store package this will be "uCommerce")
- Select your new domain from the "Host name" drop down list

- Click the save disk button in the top left
3. Setup Your Product Definitions
A “Product Definition” is uCommerce’s concept of document types, it allows you to add additional information to the product. If you’re using the uCommerce starter store, you’ll get a couple of product definitions out of the box –software and support. At the moment, you can't add additional properties through the uCommerce back end (i.e. if you wanted to add additional information such as Meta Keywords/Descriptions etc -I'll cover how we got around this in a later post) but there are a number of default the category/product properties (I've put their XML reference in brackets where relevant):
uCommerce Category Properties
- Image (@image)
- Display Name (@displayName)
- Description (@description)
The default XML looks like this:
<category parentCategoryId="" parentCategoryName="" index="0" id="67" name="Software" displayName="Software" displayOnSite="True" description="" image="" />
uCommerce Product Properties
- SKU (@sku)
- Internal name
- Display on web site (@displayOnSite)
- Allow ordering (@allowOrdering)
- Thumbnail (@thumbnailImage)
- Primary image (@primaryImage)
- Display name (@displayName)
- Short description (@shortDescription)
- Long description (@longDescription)
The default XML looks like this (the variants are not standard but are there because they're setup as part of the store package):
<product index="0" sku="100-000-001" displayName="uCommerce 1.0 RTM" shortDescription="uCommerce is a full featured e-commerce platform with content management features powered by Umbraco. Everything you need to build a killer e-commerce solution for your clients!" longDescription="uCommerce is fully integrated with the content management system Umbraco, which provides not only the frontend renderendering enabling you to create beautifully designed stores, but also the back office capabilities where you configure and cuztomize the store to your liking.

uCommerce_ foundations provide the basis for an e-commerce solution. Each foundation addresses a specific need for providing a full e-commerce solution to your clients. foundations in the box include a Catalog Foundation, a Transactions Foundation, and an Analytics Foundation.

Each of the foundations within uCommerce_ are fully configurable right in Umbraco. No need to switch between a multitude of tools to manage your stores. It's all available as you would expect in one convenient location." thumbnailImage="1097" primaryImage="1097" allowOrdering="True" isVariant="False" displayOnSite="True" hasVariants="True" price="3495.0000" currency="EUR">
<variants>
<product index="0" sku="100-000-001" displayName="Developer Edition" shortDescription="" longDescription="" thumbnailImage="0" primaryImage="0" allowOrdering="False" isVariant="True" displayOnSite="False" hasVariants="False" variantSku="001" price="0.0000" currency="EUR" Downloadable="on" License="Dev" />
<product index="1" sku="100-000-001" displayName="30 Days Evaluation" shortDescription="" longDescription="" thumbnailImage="0" primaryImage="0" allowOrdering="False" isVariant="True" displayOnSite="False" hasVariants="False" variantSku="002" price="3495.0000" currency="EUR" Downloadable="on" License="Eval" />
<product index="2" sku="100-000-001" displayName="Go-Live" shortDescription="" longDescription="" thumbnailImage="0" primaryImage="0" allowOrdering="False" isVariant="True" displayOnSite="False" hasVariants="False" variantSku="003" price="3495.0000" currency="EUR" Downloadable="on" License="Live" />
</variants>
</product>Adding additional product properties is simple.
- Click the "Commerce" section button
- Navigate to: Settings --> Catalog --> Product Definitions
- Choose the product definition you would like to edit (or create a new one in the same way that you would with Umbraco document types)
- Right click the product definition you need to add extra properties to and click "Create"
- Type in a name for your new property i.e. Size
- Choose the Data Type for the property (if you need something that's not listed see "Creating your own Data Type" below):
- ShortText -A textbox
- LongText -A text area
- Number -Beleive it or not, a numeric value
- Boolean -A checkbox
- Image -A media selector
- Click the "Create" button
- You can now choose a few additional options for the new property including how it should be shown to the user and whether it's Multilingual.
- Name -the text used as the label in the uCommerce product editor (it's also the name of the attribute on the XML that will contain it's value)
- Data Type -the type of control to render in the uCommerce product editor
- Multilingual -whether the control should be shown on the "Common" tab of the uCommerce product editor or the language specific tab
- Display On Web Site -A flag that's sent out in the XML so you can decide whether or not to show it on the website
- Variant Property -Whether this should appear as a table column heading under the "Variants" tab (I'll go into variants more in a later post)
Note: Do not set Multilingual and Variant property to both true as at the moment, it won't be shown in the uCommerce product editor -you've been warned! - Render in Editor -Whether the control should be shown in the uCommerce product editor screen or hidden from the administrator (i.e. for data you want to use internally only and should be editable)
- Finally you'll need to enter in a Display Name for the various languages. This is what's shown to the user if you dynamically pull through the various properties on the product details page.
4. Creating Your Own Data Type
Now, you may be thinking that using that set of data types is a little limiting for something like "Size" or "Colour" and you might want to display something a little more flexible to the user -such as a drop down list. This is easy enough:
- Right click the "Data Types" node
- Enter a name i.e. "Size"
- Choose the definition for the Data Type (for size we will use "Enum")
- Save and Refresh the "Data Types" node
- Right click your new Data Type and click Create
- Enter your Option's value i.e. "Small"
- Repeat 5-6 until all your options are set i.e. add "Medium" and "Large"
Note: At the moment, the enum values cannot be re-ordered through the UI so make sure you add them in the order you want them in the editor!
5. Load Your Catalog
Once you've finished creating your various product types, it's time to create your catalog. Creating categories and products within uCommerce is as simple as creating pages in Umbraco. Using the same right click menu concept you can create nested categories as deep as your catalog requires. You can add products and categories at any level by choosing either the "Category" or "Product" radio button and choosing your product type.
6. You're Done!
Assuming you've followed the steps above, you should now have a (fairly basic) store setup. Go to your site's homepage and click the "uCommerce" menu item and voila, your categories and products should be listed.
Not getting the categories you were expecting? Perform the helpful xsl “copy-of” trick within either the "RootCategories[XSLT].xslt" file or "Category[XSLT].xslt" file:
<pre><xsl:copy-of select="$categories" /></pre>
and then have a look at the output:
<errors><error>No product catalog group found supporting the current URL.</error></errors>
If you're getting the above error, currently (and this may be a misunderstanding/changed later) you have to have the catalog and catalogue group names the same –in the example site, they’re both “uCommerce”.
As I think the concept store offered with Software/Support isn't particularly real-world, I'm going to work on creating a basic store that you can use to better understand uCommerce and it's intricacies.
Check back soon as I'll be posting an overview of the checkout process, the various XSLT files and integrating payment gateways into uCommerce (initially SagePay, PayPoint, WorldPay and PayPal).
Liked this post? Got a suggestion? Leave a comment